|
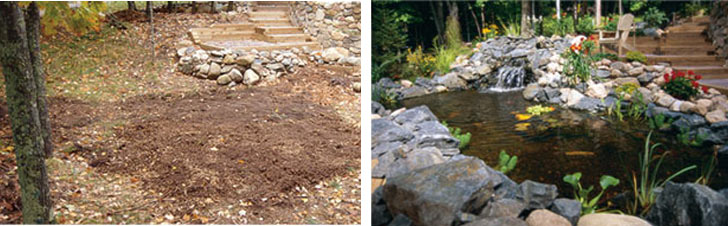
The popularity of backyard ponds continues to grow at a vigorous pace. With the availability of better equipment, and the advent of complete pond kits, construction has never been easier. If you have been thinking about building a pond, don't put it off until spring. For many reasons, fall is the best time to plan and build:
- Spring rains can delay construction for weeks. Fall weather is dryer, cooler, and usually more predictable. On average, you lose fewer days to rain, and the ground is easier to work.
- Planting marginal (bog) plants in early fall allows them time to get rooted. During fall, plants focus their energy on root development rather than foliar (leaf) growth. When spring arrives they have enough stored energy for lush, healthy growth.
- Perimeter landscaping is always best accomplished in fall. Plants get better established and will be more heat resistant by summer.
- Filling the pond with water in the fall enables the pond to settle and mature. You should experience less of an algae problem, if any, as the pond reaches proper bacterial balance during cooler fall weather.
- When the water temperature warms to the appropriate level in spring, your pond will be ready for the introduction of oxygenating and floating plants.
- Pond construction can be easier if done in stages.
Draw up a plan
Don't rush your project. The more time you take to plan the better. In the long run, you save more time, money, and effort by taking extra time to research and carefully plan your pond. Recognize that ponds require forethought to help simplify construction, product selection, and ultimately routine maintenance.
Read one of the many excellent books or articles on water gardening and pond construction. By understanding principles behind
pond ecosystems, the
hierarchy of plant and fish life in and around a pond,
maintenance and water quality, you prepare yourself for any potential challenges. Fellow pond enthusiasts are easy to find. Talk to them. They will offer good advice on construction and help you avoid novice mistakes.
Next, build your pond on paper. Design a pond - choose a shape, style, and size that will enhance the beauty of your yard, yet can be easily managed.
-
Select the site. It must receive daily, a minimum of six hours of sunlight across two-thirds of its surface if you plan to have blooming pond plants. Too much sun, can overheat the water and reduce oxygen, as well as promote excessive algae growth. Many ponds need shade during the hottest part the day. Locate your pond close to your home to provide additional shade and to simplify electrical and water hook-ups. Best of all, it will provide you with the best indoor view of your pond.
- Pond water depth is important because different plants and fish do best in specific water levels. Most water lilies prefer a water depth of 18 inches. Goldfish can survive in any depth, but anything less than 18 inches can cause pond water to become too warm and reduce water quality. Koi prefer a depth of at least 3 feet. To avoid a complete freeze during winter, you may need to build deeper - four feet or more if you live in the far north. If you intend to keep koi, consult a zone chart to determine average annual freezing depth in your area.
- Next, select your pond components from a knowledgeable and experienced supplier. Key items include: pond liner, pumps, filters, water features, lights, plants, perimeter landscaping, and fish. Pond kits are an excellent option because they contain matched components as well as plumbing connections. Some even include video or DVD instructions. If you are stocking your pond with fish, don't forget pests. You may need fencing or deterrents.
- Create a step-by-step timeline. Divide your tasks into manageable and realistic stages.
Fall To-do List
- Purchase all components.
- Don't order stone by phone and take blind delivery. Be sure to visit the supplier to pick out your specific stones. If you are finding and relocating stone on your own, allow plenty of time. Be careful with the lifting and relocation! Always avoid stone that might have been treated or exposed to toxins.
- Never break ground before you contact your utility companies. This is a crucial step. Damaging a line will delay your project and may even be deadly!
- After the utilities are located and marked, check your plan to make sure they are still workable. Make adjustments if needed.
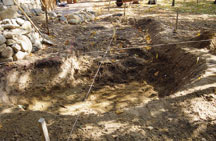
- Break ground and excavate. This is a good time to enlist the support of friends. As you remove the dirt, create strata or layers of varying depths. These layers serve as "steps" or "shelves" that increase planting options. The first shelf should be 8 to 10 inches deep for marginal plants. The second shelf 12 to 18 inches deep for lilies or lotus. The deepest level should be 2 to 4 feet deep to prevent your pond from freezing solid during frigid winters and to provide a cool retreat for fish during warm summers. Remove any materials that could puncture the liner.
- Use a bubble level to make your edging and shelves true. Take your time. This is an extremely important step, because once your pond is filled, mistakes will be noticeable, unsightly, and very difficult to correct. Save extra soil for grading around the pond and landscaping.
- Install the electric line and filter, along with any external plumbing connections. Consult a certified professional if you have any concerns installing electrical or plumbing equipment.
- Install underlayment and liner. The underlayment protects your liner from rocks and roots. Installing the liner can be a big job. Enlist more friends to help you if needed.
- Install any submerged lights called for in your plan.
- Arrange stones to secure the liner. Create edging and build waterfalls or other water features.
- Test your source water. If you rely on tap water, it may contain chlorine, chloramine, and other substances toxic to aquatic life. Use water conditioners to treat tap water.
- Fill your pond with water and then turn on pumps and filters.
- Grade ground and landscape pond area.
- To ensure water quality, test your pond water each week.
- When leaves begin to fall, cover pond with netting. This helps keep your pond free of leaves and other debris.
- When water temperature drops below 45°F, shut down your filter and remove filter media and main pump to prevent damage from freezing. Drain and store pump per manufacturer's recommendation.
Spring To-do List
- Open your new pond:
- Clean any debris from the bottom of the pond.
- Skim the surface.
- Start up the filters.
- Test the water.
- Use a bacterial additive to jump start your biological filter.
- Connect water features as soon as overnight temperatures are above 50°F.
- Check the temperature. When the water temperature reaches 70 degrees, add oxygenators and floating plants.
- Continue to monitor temperature and test water quality routinely.
To enjoy your pond early next year, start now. You will avoid the spring rush, and allow yourself more time to do things right the first time.
|