Live rock has a rugged beauty and offers a number of benefits to both reef and fish-only marine aquariums. It provides a natural food source for some fish, aids in the breakdown of waste produced by aquarium inhabitants, and creates a foundation for live corals or decorations.
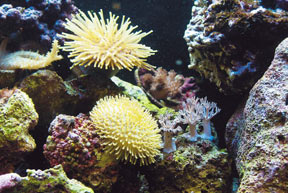 In the oceans, live rock begins as the skeletal remains of ancient corals. Over time, as countless varieties of organisms ranging from microscopic plants and animals to larger algae and invertebrates repopulate these skeletal remains, it becomes a "living rock" rich in biological diversity. These pieces of living rock are carefully harvested and kept moist to preserve most of the marine life for the reef hobbyist to enjoy.
Before introducing live rock into your aquarium, it needs to be "cured" for about 3-5 weeks. This allows the plant and marine life living on it to undergo a natural die-back. Because this die-back produces a toxic ammonia spike, you must never place un-cured live rock directly into an established aquarium containing fish, corals, or other marine animals. Fortunately, most beneficial nitrifying bacteria survive the curing process, as do some of the corals and invertebrates which re-emerge in the new aquarium over time.
A Little Patience Will Reap a Bounty of Color
Curing Processes
 For an established aquarium that contains fish, corals, or other marine animals:
- Gently rinse each piece thoroughly in saltwater.
- Place the pieces in a new 30-gallon plastic container.
- Immerse the rock in freshly
mixed saltwater with a
specific gravity between 1.023 and 1.025.
- Use a
heater to keep the water temperature between 72-78ºF.
- Create constant water movement with a
powerhead, or an
airstone.
- Keep the area dimly lit to prevent algae blooms.
- Perform 100% water changes twice weekly.
- Use a nylon bristle brush between water changes
to gently remove white film or dead material.
- After one week,
check the ammonia and nitrite levels periodically. When water conditions stabilize and ammonia and nitrite test zero, the rock is now aquarium ready.
For a new aquarium that does not yet contain fish, corals, or any other marine animals: Fill the aquarium with premixed saltwater with the desired specific gravity of 1.023-1.025. Activate all
filtration equipment, check for leaks, and set
heater and/or
chiller to the desired temperature of 72-78ºF.
- Gently rinse each piece thoroughly in saltwater.
- Arrange the pieces in the aquarium.
- Keep the lighting system off to prevent algae blooms.
- Use a nylon bristle brush at intervals to gently remove white film or dead material.
- Perform 50% water changes weekly.
- Check the ammonia and nitrite levels in the aquarium weekly.
- When both the ammonia and nitrite levels are zero, perform a 50% water change. After 24 hours, check the pH of the water and adjust as needed to achieve the desired level of 8.1-8.4.
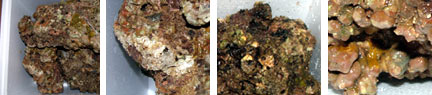
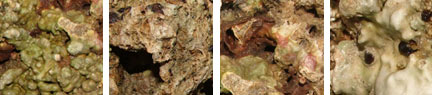
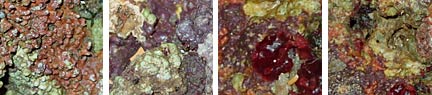
The Curing Process from Arrival to Established Rock
 |
|
ARRIVAL - When first received, this rock will vary in coloration, shape and size. The different micro fauna may not be very visible at first, but are deep inside the crevices of the rock. |
 |
|
CURING - During the curing process, some die off will normally occur, and the rock may be scrubbed to remove these areas. When cured in a separate container, it is common for the coralline algae to start to turn white. Frequent water changes will help to reduce the stress on the life inside the crevices of the rock. |
 |
|
ESTABLISHED - Once cured, maintained under the proper lighting, and supplemented with buffers and calcium, this rock will regain its diversity of bright colored coralline algae, and many beneficial life forms will begin to appear and populate the display aquarium. |
Sculpt an Underwater Rock Garden
Most live rock arrangements mimic nature: A central mound, a horseshoe, a triangular footprint, or even a pair of submerged islands separated by a narrow channel. But aquascaping can also be fanciful, littered with sunken treasure or the like.
Consider these planning and construction tips:
- Create your design on paper in advance.
- Leave sufficient room in your design for the growth of
corals and plants. Also, allow space to facilitate water flow and conceal
tubing, as well as access for
maintenance.
- It is acceptable to alter the shapes and sizes of the rock with a hammer and chisel, or even a drill. This is known as "hardscaping" and will not damage the integrity of the rock, nor its inhabitants.
- To avoid accidents or shifting during maintenance use fasteners or glues to hold together your "permanent" structures. Two-part
epoxy glues or long plastic ties work well with live rock.
Bring Out the Best in Your Live Rock
Proper water conditions and
lighting allow the live rock to mature and develop in color and in bio-diversity. Use of
supplements including
calcium,
iodine,
strontium, and
trace elements promote health in and on the rock.
Live rock requires patience, but with good handling and care it will develop beautiful coloration as it matures in your aquarium. |